Adding Google Fonts to Your Personal Website 2023
(revised, April 2023) |

- Open Google Chrome
- Go to https://fonts.google.com/
- Choose three fonts. You will need fonts that can be used for Body Text and Links as well as Heading 1, Heading 2, and Heading 3. Note that you can change both the sample text and it's size as you are searching.
- Click “Add to Cart” for three different fonts.
- Click on the font
- Select a style
- Add more styles if you wish
- Click your back button
- Lather, rinse, repeat until you have chosen three fonts.
- Click on the Cart icon in the upper right corner
- Click <> Get embed code
- On the Web tab, make sure <Link>. is selected.
- In the Embed code in the <head> of your html section, Click the copy icon in the lower right hand corner.
- Return to Dreamweaver, and open your index.html document.
- Switch to Code view
- At the top of your page, click to the left of your closing head tag </head>
- Hit Enter once.
- Hit your up arrow once.
- Ctrl+V to Paste your new Google Font's HTML code.
- Return to the Google Fonts page in Google Chrome.
- Using the same method, Copy the first font's CSS Class code
- Return to Dreamweaver, and open your CSS document.
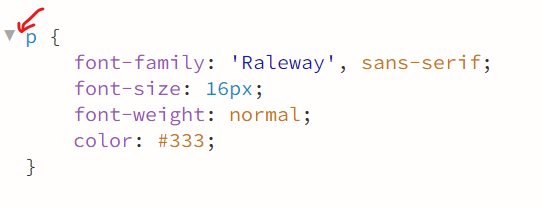
- Scroll down to your paragraph section, and click to the left of the letter p.
- Hit enter twice.
- Hit your up arrow twice.
- Ctrl+V to Paste in your first Google Font's CSS code.
- Replace your existing p (paragraph) font with the Google Font you chose for body text.
- select the new font, and copy it Ctrl+C
- Select the existing font, and paste Ctrl+V
- Use the same method to add the CSS Class code and replace your existing Heading 1, Heading 2, and Heading 3 fonts with the Google Fonts you chose for Headings.
- Replace your existing a:link, a:hover, a:active and a:visited fonts with the Google Font you chose for body text.
- Save your CSS and your index.html
- Preview your work.
- Adjust the sizes of your new Google Fonts in your CSS as needed. You will probably find they are either too large or too small for your design.
- Repeat steps 5 through 12 to add your new font's HTML code to your remaining pages:
- academics.html
- interests.html
- gallery.html
- tutorials.html
- links.html
- Preview your work
- Troubleshoot and revise as needed.
- Enjoy your new Google Fonts!
|
Advanced:
- Select the text and table below this section starting with the words "Heading One" and ending with the "My Color Scheme" table.
- Ctrl+C to Copy
- Open your index.html page in Dreamweaver in Code View.
- Click below the #main DIV
- Hit enter 20 times to add LOTS of space after your #main DIV.
- Ctrl+V to Paste
- You will use this preformatted text to test your new Google Fonts.
- You can use the table to record your color scheme at a later date.
Heading One
Heading Two
Heading Three
This is my default text formatting.
This is my paragraph formatting.
This is my default vertical and horizontal alignment. This is my default vertical and horizontal alignment. This is my default vertical and horizontal alignment. This is my default vertical and horizontal alignment. |
This is my hyperlink formatting.
My Color Scheme |
| tag |
#hexadecimal |
Color |
| body |
|
|
| bg |
|
|
| p |
|
|
| h1 |
|
|
h2 |
|
|
| h3 |
|
|
| a:link |
|
|
| a:visited |
|
|
| a:hover |
|
|
| a:active |
|
|
|
|
|